2012年11月29日 星期四

sony prs-t1 使用心得 (-1) - 購買過程

還是有些人搞不清楚平板電腦和電子書閱讀器的不同, 認為拿平板電腦來看電子書就是所謂的電子書。電子書閱讀器的畫面是電子墨水, 不同於 LCD, 可以想成看印表機印出 A4 紙張的感覺。拿著平板電腦那種螢幕來看, 和用電腦看沒什麼分別, 眼睛無法承受那麼久的閱讀時間。

電子墨水雖然畫面很不錯, 但是更新畫面時會閃爍, 這也是讓我卻步的主因。不過在這幾年的發展後, 有了改善, 只是我覺得還是不夠好就是。

電子墨水也可以很順的, 有人對 Nook Simple Touch 動了一些手腳,然後玩 SEGA 模擬器...超順的: http://www.e-reader-info.com/sega-genesis-emulator-ported-nook-simple-touch

一直都有在注意 kindle 電子閱讀器, 2007 年 Amazon 推出 Kindle 電子書閱讀器, 不過直到 2012 年我才購買了電子閱讀器。

台灣也有幾款電子閱讀器, 本來打算買 green book, 不過總是看不到實機 (幾乎只能在北部看到), 而我又錯過優惠價, 再加上又封印瀏覽器的功能, 我轉而改向 sony ereader prs-t1, 很可惜阿!行銷用力點的話, 我可能早就買了, 最主要是沒有實機展示, 讓我很辛苦的查詢其功能。

其實台灣的硬體思維不太適合出電子閱讀器, Amazon 要賺的是賣書的錢, 台灣沒有建設這樣的服務, 靠賣硬體賺錢不是太容易。


Price: $159.99


Only 2 left in stock.
Ships from and sold by etrader2008.
6 new from $129.99 4 used from $99.99


sony eReader prs-t1 有第二代的 prs-t2 版本, 不過這是 cost down 版本, 少了耳機孔。
amazon sony ereader prs-t1 不送台灣, 我苦思如何才能買到, 台灣的拍賣很少在賣, 要不然就是太貴, 我轉向 ebay 求助。

http://www.ebay.com/itm/290802330925?ssPageName=STRK:MEWNX:IT&_trksid=p3984.m1497.l2649

2012/11/08 標到, 2012/11/28 收到, 等很久是國外購物的缺點。


PricePaid or notItem shipped or notFeedback left or notFeedback received or notActions
Item picture
Sony eReader PRS-T1 2GB, Wi-Fi, 6in - White (290802330925)
Your max bid: C $121.00
Sale date: 11/08/12
Tracking number: 7210029695272640
C $120.68

$121.38
+ C $9.94
shipping
Paid with PayPal on November 10, 2012.
Shipped 11/12/12
Feedback not left
Feedback not received

這台競爭者眾, 我最後以 120.68 加拿大幣購得, 運費是 9.94 加拿大幣, 折合台幣 3928。

同時間我競標另外一台黑色的的候補:
http://www.ebay.com/itm/160914629668?ssPageName=STRK:MEDWX:IT&_trksid=p3984.m1435.l2649

這台 115 美金結標, 若加上運費, 兩者差不多, 不過我喜歡白色的版本。

皮套要價 1400, 真是令人驚訝, 我算賺到嗎?
[UNIGO] 日本代買 SONY Reader PRS-T2 PRS-T1 皮套 PRSA-SC22 黑色 白色 紅色 左開 右開 均可
有燈的皮套:
http://item.taobao.com/item.htm?id=18804660581&ali_trackid=2:mm_11446871_0_0:1354429895_4k3_2053586432

不清楚到底這兩種費用如何?


paypal 列出的相關費用:

QtyItemOptionsPrice
1Sony eReader PRS-T1 2GB, Wi-Fi, 6in - White
Item # 290802330925
$120.68 CAD
Amount $120.68 CAD


Item Total:
$120.68 CAD
Sales Tax:

Shipping:
$9.94 CAD
Seller discount or charges:
$0.00 CAD


Total amount:
-$130.62 CAD (equals -NT$3,928 TWD)
Fee amount:
$0.00 CAD
Net amount:
-$130.62 CAD
Date:
2012-Nov-10
Time:
17:24:07 PST
Status:
Completed


Conversion from:
-NT$3,928 TWD
Conversion to:
$130.62 CAD
Exchange rate:
1 New Taiwan Dollar = 0.0332554 Canadian Dollars


Insurance:
$0.00 CAD

Shipment Information

Shipping Status: 
 
Shipped
Item Number: 
 Canada Post 7210029695??????


Service Type: 
 International Air Small Packets (6 - 10 business days)
Dimensions: 
 25 X 15 X 2 cm
Planned Drop-off Date: 
 2012-Nov-12
Shipping Insurance: 
 No 
track number 一樣沒什麼用, 我都收到了還是沒更新。這是普通郵件, 不是掛號, 寄不見了就查不到了, 賣家很大膽阿!

這次的賣家位於 Markham, Canada:


檢視較大的地圖

我很討厭所謂買東西要先做功課這件事情, 買東西應該是要一件輕鬆愉快的事, 為什麼要了解你的產品還要這麼辛苦打探資料, 查詢網路上使用者的心得, 一篇一篇看過, 其實到賣場親自把玩一次不就解決了, 這麼容易做的事為什麼不做呢? 我在賣場有看到舊款的 green book, 但無法任意把玩, 而且也沒有新款的展示, 又不是像 kindle 之類的產品, 台灣無實體通路, 被我淘汰實在冤枉, 我可是在 2011/12 就幾乎決定要買 green book, 因為我不想網路購買 kindle, 而要是先買了 green book, 我可能不會購買 sony prs-t1。

等了 16 天, 終於拿到了。


沒考慮 kindle 是因為 kindle 4 封印了瀏覽器的功能, 只能看 amazon 相關網站 (只限制於 3g 版本, 我沒用過不確定, 請自己打聽確認), 也不能外接 sd 卡; 又聽說 sony prs-t1 的頁面更新很快, 有人直接賣出 green book 改用 sony prs-t1, 看到這樣的消息我怎能忍住這樣的誘惑, 自然花了點時間打聽 sony prs-t1。為了這次的選購, 我花了好些功夫, 最後終於決定購買 sony prs-t1。最主因為: 這台是 android 系統, 可以 root, 功能會很豐富, 我也加入低頭一族了。而有換頁按鍵又有觸控螢幕更是吸引我, 我認為這兩個功能都需要, 有各自的好處。

皮套是賣家付的, 不過我花了很大的力氣才拿出來, 請參考Sony官網 皮套User Guide圖解說明: http://www.docs.sony.com/release/PRSASC22.pdf
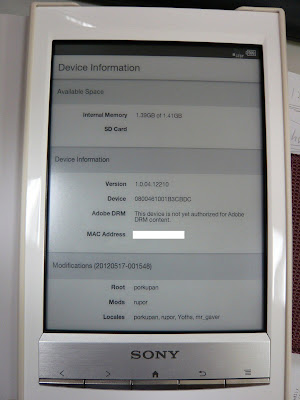
軔體版本: 1.0.04 12210
android 版本: 2.2.1
kernel 版本: 2.6.35.3, 想也知道, 自然是 linux kernel 版本。


Kindle Touch vs Nook Touch and Sony Reader PRS-T1 Comparison:


傳檔案到 sony ereader prs-t1:
使用內附的 micro usb 連上電腦, 按下 data transfer mode button。我是連上 linux。


linux 下連結 usb 的 log
 1 [93160.464593] usb 1-1.1: configuration #1 chosen from 1 choice
 2 [93160.471260] scsi10 : SCSI emulation for USB Mass Storage devices
 3 [93160.471428] usb-storage: device found at 10
 4 [93160.471432] usb-storage: waiting for device to settle before scanning
 5 [93165.453765] usb-storage: device scan complete
 6 [93165.454836] scsi 10:0:0:0: Direct-Access     Sony     PRS-T1           2001 PQ: 0 ANSI: 2
 7 [93165.456828] scsi 10:0:0:1: Direct-Access     Sony     PRS-T1  SD       2001 PQ: 0 ANSI: 2
 8 [93165.458814] scsi 10:0:0:2: Direct-Access     Sony     PRS-T1  Setting  2001 PQ: 0 ANSI: 2
 9 [93165.459626] sd 10:0:0:0: Attached scsi generic sg5 type 0
10 [93165.460027] sd 10:0:0:1: Attached scsi generic sg6 type 0
11 [93165.460812] sd 10:0:0:2: Attached scsi generic sg7 type 0
12 [93165.479109] sd 10:0:0:0: [sde] Attached SCSI removable disk
13 [93165.502041] sd 10:0:0:1: [sdf] Attached SCSI removable disk
14 [93165.524675] sd 10:0:0:2: [sdg] Attached SCSI removable disk
15 [93174.104026] FAT: unable to read boot sector
16 [93176.516625] EXT4-fs (sda2): mounted filesystem with ordered data mode
17 [93275.594410] sd 10:0:0:0: [sde] 2958976 512-byte logical blocks: (1.51 GB/1.41 GiB)
18 [93275.596254] sd 10:0:0:2: [sdg] 20528 512-byte logical blocks: (10.5 MB/10.0 MiB)
19 [93275.598364] sd 10:0:0:0: [sde] Assuming drive cache: write through
20 [93275.600422] sd 10:0:0:2: [sdg] Write Protect is on
21 [93275.600428] sd 10:0:0:2: [sdg] Mode Sense: 0f 00 80 00
22 [93275.600433] sd 10:0:0:2: [sdg] Assuming drive cache: write through
23 [93275.610353] sd 10:0:0:0: [sde] Assuming drive cache: write through
24 [93275.610364]  sde:
25 [93275.612373] sd 10:0:0:2: [sdg] Assuming drive cache: write through
26 [93275.612380]  sdg:
27 [93275.622189] 

這裡分別是音樂、書籍、照片、xx 的目錄:
linux:~# ls /media/05D7-11FA/Sony_Reader/media/images/
audio  books  images  notepads

linux:~# ls /media/SETTING/
dll  resources  Setup Reader for Mac.app  Setup Reader for PC.exe


ref:


2012年11月26日 星期一

gdb 小技巧

很久沒用 gdb 了, 大多使用 printf 大法, 不過最近在 debug simple os 時, 意外發現 qemu/bochs + remote gdb 異常的好用。趕緊複習一下 gdb。

取得其他 architecture 的 gdb 版本, 才可以 debug arm 平台。

sudo apt-get install gdb-multiarch
set architecture i8086

layout asm 顯示組合語言 ctrl+x ctrl+a 切換為 TUI mode stepi (si) /nexti single for asm

在 c 和組合語言交互調試除錯時, 需要在這兩個畫面切換, 這個威力強大, 要成為底層工程師, 一定會要用這招。

20240229 補充:
在 tui mode 下如果開啟 mouse 支援, 無法在終端機用 mouse 複製/貼上, 可以按下 shift, 就可以複製貼上。我測試了 set tui mouse-events off 試圖關掉 mouse support, 但 gdb 回沒有這個指令。

ref:
trace system call 組合語言時, gdb layout asm 畫面


gdb.sh
1 file p_kernel.elf
2 target remote localhost:1234
3 b kernel_main 
4 b task_sys 
5 b restart
6 b proc_a 
7 b get_ticks
8 b sys_sendrec


這是在 debug simple os ipc 時, 我用的 script file。

gdb -x script
gdb -x gdb.sh
搞定。

指定某記憶體位址做反組譯
disassemble 0x00b068ea,0xb0695f


觀察某位址內容
2 (gdb) x/4xb 0x1459a0
3 0x1459a0 <ready_process>:       0xd4    0x5a    0x14    0x00
4 
5 (gdb) x/1xw 0x1459a0
6 0x1459a0 <ready_process>:       0x00145ad4


modify register, memory address, variable value
set $eax = 0
set {int}0x83040 = 4
set variable i = 10


在某個位址設定中斷點
(gdb) break *0x7c00


from Liao Wen Satoshi 這幾天的segmentation fault結束了。分享gdb指令 watch *0xxxxxxxxxx: 當該位址被寫入時break

rwatch *0xxxxxxxxxx: 當該位址被讀取時break

x/數量x: 顯示記憶體數量的16進位

define hook-指令: 當下指令的時候跑定義的行為 ex: define hook-next x/40x 0xxxxxxxx


找出所有的 source files: info sources 指定 source files path: source/directory source_file_path

使用 gdb 反組譯 gdb -batch -ex 'file exe_file' -ex 'disassemble main'

ref:

2012年11月25日 星期日

2012/10/27 ~ 2012/10/28 mopconf

mopconf 在高雄軟體園區的大型演討會, 對於這樣的活動我並不陌生, 但對於在南部參加這的活動, 在我印象中, 這是我的第一次, 希望不是最後一次。

地點在高雄軟體園區海景會議廳, 一上到這層, 真的看得到海景阿!


因為某事件, 我只參加 20121028 這天的議程, 收穫滿滿, 肚子吃的很飽 (有附早餐和午餐), 產業技術也知道不少, 和同道好友閒聊, 真是痛快。對了, 還送了一件 t-shrit, 可是我覺得黑的比較好看, 那是工作人員專用的。

lighting talk 很有趣, 看著那麼多人輪番上陣, 有趣又有料, 令人享受的 show。

ref:
https://www.facebook.com/mopcon/timeline?filter=2

2012年11月22日 星期四

gcc c call convention

environment: x86 32bit

看過 openwatcom c/pascal call convention, 接著看 linux 上最常用的 gcc, 它是如何生成產生 c call convention 的組合語言。

x86 push 指令會先將 %esp - 4 (32bit 環境) 然後將某個值複製到 %esp - 4 的位址。

ex:
%esp = 0xfff4

pushl $5
%esp - 4
copy $5 %esp (0xfff0)

asm_func.S
 1 .global asm_func
 2 asm_func:
 3    push   %ebp
 4    mov    %esp,%ebp
13    pushl $addr
14    pushl $56
15    pushl $'z'
16    pushl $fmt
18    call printf
19    addl $16, %esp
25    mov %ebp, %esp
26    pop %ebp
27    ret    
28 

37 .data
38 fmt: .asciz "%c %d %p\n"
39 addr: .asciz "str addr"
40 esp_fmt: .asciz "func esp: %x\n"
41 esp_value: .int

asm_func 是一個組合語言 function, 但使用 c 語言 call convention, 所以可以被 c 呼叫用來傳遞 c 參數, 就像這樣:
void asm_func(char c, int i, const char *ptr);
asm_func('a', 9, (char*)(0x1234));
不過這篇的主題不談這個。

 3    push   %ebp
 4    mov    %esp,%ebp
 
25    mov %ebp, %esp
26    pop %ebp
前後這段只是反向操作, 應該沒什麼問題。不過我的程式並沒有用到 %ebp, 為何要這樣做呢?原因是會有用到的時候, 有機會再談。這篇的主題一樣不談這個。

13    pushl $addr
14    pushl $56
15    pushl $'z'
16    pushl $fmt
18    call printf
19    addl $16, %esp

x86 c calling conventions 由右往左把 $addr, $56, $'z', $fmt 複製到 stack 中, 以 c 來看 L13 ~ L18 就像這樣:

printf("%c %d %p\n", 'z', 56, (char*)(0x80497be) );

pushl 4 次, 自然在 printf 執行後, 要把 esp 加回來 4+4+4+4 = 16, 這就是很多書上提到的 c 語言的 call convention。呼叫的一方負責把 stack 復原。但這些書沒提到的是 ...

看看 gcc 反組譯的結果, 令人驚訝, 看不到上述的結果, 而是:

gcc -S ...

 1 .global asm_func
 2 asm_func:
 3    push   %ebp
 4    mov    %esp,%ebp
 5    sub    $0x28,%esp
 6 
 7    movl   $addr,0xb(%esp)
 8    movl   $56,0x8(%esp)
 9    movl   $'z',0x4(%esp)
10    movl   $fmt, (%esp)
18    call printf
 
25    mov %ebp, %esp
26    pop %ebp
27    ret    
28 
37 .data
38 fmt: .asciz "%c %d %p\n"
39 addr: .asciz "str addr"
40 esp_fmt: .asciz "func esp: %x\n"
41 esp_value: .int


 5    sub    $0x28,%esp
 6 
 7    movl   $addr,0xb(%esp)
 8    movl   $56,0x8(%esp)
 9    movl   $'z',0x4(%esp)
10    movl   $fmt, (%esp)
18    call printf

呼叫的一方沒有將 stack 恢復 (沒有這樣的程式碼 addl $16, %esp), 其實不能這麼說, 而是呼叫的一方並沒有更動 stack pointer 自然不需要回復。

L5 先將 esp 留出 0x28 byte 空間, 再使用 L7 - L10 的方式將參數填入 stack, 一樣照右至左的順序, 這是書上沒提的部份, 我被這想法困擾很久了。在用組合語言呼叫 C 的時候, 大部份都是使用 asm_func.S 的作法, 後面的作法總是讓我困惑, 這次終於搞懂了。

回頭提這個:

 3    push   %ebp
 4    mov    %esp,%ebp
 
25    mov %ebp, %esp
26    pop %ebp
 

gcc 也不是生成(我才不寫這術語, 留點台灣味) 產生 L25, L26 的指令, 而是  leave, 因為 leave 就等於是這兩個指令。function return 實在太常使用, intel 創造了這個指令, 也相當程度混淆了初學者理解 c function return 這部份。

like this:

3    push   %ebp
4    mov    %esp,%ebp
25   leave

這就是 gcc 產生的組合語言。asm_func.S 是我從 gcc 反組譯之後修改過來的, 然後加上 printf 這些測試程式碼。和 open watcom 比較起來, open watcom 的組合語言程式碼容易理解, 不過基本原理都是一樣的。

ref:
http://en.wikipedia.org/wiki/X86_calling_conventions
http://stackoverflow.com/questions/672268/fastcall-gcc-example
http://pcmanlin.blogbus.com/logs/57953276.html
http://m.newsmth.net/article/KernelTech/69
http://stackoverflow.com/questions/7760736/gcc-fastcall-function-definition

2012年11月19日 星期一

pascal call convention in c - 3 questions

test env:
  • in ubuntu 10.04 64bit, but the test code is 32bit
  • intel x86

gcc 無法提供 pascal call convention, 我用了 open watcom 來測試 pascal call convention。


a.c
 1 #include <stdio.h>
 2 
 3 __declspec(__cdecl) int foo1(int a, int b)
 4 {
 5   a+=1;
 6   return a;
 7 }
 8 
 9 __declspec(__pascal) int foo2(int a, int b)
10 {
11   a+=1;
12   return a;
13 }
14 
15 __declspec(__cdecl) int foo3(int a, ...)
16 {
17   a+=1;
18   return a;
19 }
20 
21 __declspec(__pascal) int foo4(int a, ...)
22 {
23   a+=1;
24   return a;
25 }
26 
27 int main(int argc, const char *argv[])
28 {
29   int x=-1;
30 
31   x=foo3(1, 2, 3);
32   printf("x=%d\n", x);
33   x=foo4(1, 2, 3);
34   printf("x=%d\n", x);
35   x=foo1(1, 2);
36   printf("x=%d\n", x);
37   x=foo2(1, 2);
38   printf("x=%d\n", x);
39   return 0;
40 }

編譯指令:
wcl386 -c -s -d1 a.c 
wcl386 a.o

執行結果
x=2
x=4
x=2
x=2

a.dis
 1 a:     file format elf32-i386
 2 
 3 Disassembly of section .text:
 4 
 5 08048110 <_foo1>:
 6  8048110: 8b 44 24 04           mov    0x4(%esp),%eax
 7  8048114: 40                    inc    %eax
 8  8048115: c3                    ret    
 9 
10 08048116 <FOO2>:
11  8048116: 8b 44 24 08           mov    0x8(%esp),%eax
12  804811a: 40                    inc    %eax
13  804811b: c2 08 00              ret    $0x8
14 
15 0804811e <_foo3>:
16  804811e: 8b 44 24 04           mov    0x4(%esp),%eax
17  8048122: 40                    inc    %eax
18  8048123: c3                    ret    
19 
20 08048124 <FOO4>:
21  8048124: 8b 44 24 04           mov    0x4(%esp),%eax
22  8048128: 40                    inc    %eax
23  8048129: c3                    ret    
24 
25 0804812a <main_>:
26  804812a: 53                    push   %ebx
27  804812b: 51                    push   %ecx
28 
29  804812c: 6a 03                 push   $0x3
30  804812e: 6a 02                 push   $0x2
31  8048130: 6a 01                 push   $0x1
32  8048132: e8 e7 ff ff ff        call   804811e <_foo3>
33  8048137: 83 c4 0c              add    $0xc,%esp
34 
35  804813a: 50                    push   %eax
36  804813b: 68 04 b0 04 08        push   $0x804b004
37  8048140: e8 5b 00 00 00        call   80481a0 <printf_>
38  8048145: 83 c4 08              add    $0x8,%esp
39 
40  8048148: 6a 01                 push   $0x1
41  804814a: 6a 02                 push   $0x2
42  804814c: 6a 03                 push   $0x3
43  804814e: e8 d1 ff ff ff        call   8048124 <FOO4>
44  8048153: 83 c4 0c              add    $0xc,%esp
45 
46  8048156: 50                    push   %eax
47  8048157: 68 04 b0 04 08        push   $0x804b004
48  804815c: e8 3f 00 00 00        call   80481a0 <printf_>
49  8048161: 83 c4 08              add    $0x8,%esp
50 
51  8048164: 6a 02                 push   $0x2
52  8048166: 6a 01                 push   $0x1
53  8048168: e8 a3 ff ff ff        call   8048110 <_foo1>
54  804816d: 83 c4 08              add    $0x8,%esp
55 
56  8048170: 50                    push   %eax
57  8048171: 68 04 b0 04 08        push   $0x804b004
58  8048176: e8 25 00 00 00        call   80481a0 <printf_>
59  804817b: 83 c4 08              add    $0x8,%esp
60 
61  804817e: 6a 01                 push   $0x1
62  8048180: 6a 02                 push   $0x2
63  8048182: e8 8f ff ff ff        call   8048116 <FOO2>
64 
65  8048187: 50                    push   %eax
66  8048188: 68 04 b0 04 08        push   $0x804b004
67  804818d: e8 0e 00 00 00        call   80481a0 <printf_>
68  8048192: 83 c4 08              add    $0x8,%esp
69 
70  8048195: 31 c0                 xor    %eax,%eax
71  8048197: 59                    pop    %ecx
72  8048198: 5b                    pop    %ebx
73  8048199: c3                    ret    


先來看看什麼是 c call convention:
  1. 由右到左傳入 function 的參數; 所以 a.c L35 x=foo1(1, 2); 對應到 a.dis L51 ~ L54 (push $2, push $1)
  2. 由呼叫者清除堆疊; 所以 call foo1 之後, 要把 %esp 加回 8

再來看看什麼是 pascal call convention:
  1. 由左到右傳入 function 的參數; 所以 a.c L37 x=foo2(1, 2); 對應到 a.dis L61 ~ L63 (push $1, push $2)
  2. 由被呼叫者清除堆疊; 所以 a.dis L13 ret $8。

這很容易理解, 最主要我想討論三個問題:
  1. 為什麼 pascal call convention 效率好?
  2. 為什麼 pascal call convention 由被呼叫者清堆疊? c call convention 為什麼不能由被呼叫者清堆疊?
  3. 為什麼 pascal call convention 不能支援不定個數參數?
Q3:
為什麼 pascal call convention 不能支援不定個數參數?

從 a.dis L21 可得到 foo4 的參數 a 是 3, 並不是 1, 是因為編譯器產生的是 mov 0x4(%esp),%eax 所以不能得到第1個參數 a 嗎?編譯器只要產生 mov 0xc(%esp),%eax 不就可以得到 a 了, 為什麼不是這樣呢?

因為:

對於
x=foo4(1, 2, 3);
x=foo4(1, 2, 3, 4, 5);
編譯器無法同時產生
mov 0xc(%esp),%eax
mov 0x14(%esp),%eax
來得到 a, 對於一個 foo4() 只能產生同一種組合語言, 所以只好產生
mov    0x4(%esp),%eax
來得到第1個參數, 這也就會需要由右到左傳入 function 的參數。


Q2:
為什麼 pascal call convention 由被呼叫者清堆疊? c call convention 為什麼不能由被呼叫者清堆疊?

因為只能產生同一份組合語言, 這樣的 code ret $8 一定要固定。
x=foo4(1, 2, 3);
x=foo4(1, 2, 3, 4, 5);
對於這樣的程式碼來說,不能產生 return $12 又產生 return $20。
所以 pascal call convention 在不定個數參數下無法使用。
c call convention 在不使用不定個數參數下也可以由被呼叫者清除堆疊。

Q1
為什麼 pascal call convention 效率好?

ref: http://en.wikipedia.org/wiki/X86_calling_conventions#Callee_clean-up

When the callee cleans the arguments from the stack it needs to be known at
compile time how many bytes the stack needs to be adjusted. Therefore, these
calling conventions are not compatible with variable argument lists, e.g.
printf(). They may be, however, more space efficient, as the code needed to
unwind the stack does not need to be generated for each call.

因為看到 pascal call convention 效率會比較好 (不記得在那看到的), 看了 wiki, 應該是指 space efficient, 不是速度上的快。

Q1, Q2:
我看不出來 pascal call convention 效率好, 也看不出來為什麼 c call convention 不能由被呼叫者清堆疊?編譯器可以產生 push $1, push $2, 應該可以得知 ret $8, 和由右到左傳入或是由左到右傳入有什麼差異?

感謝 ptt LPH66 的回應:
http://www.ptt.cc/bbs/C_and_CPP/M.1353294706.A.6B4.html

2012年11月15日 星期四

openwatcom in linux

the 1st edition: 20121115 (4)
the 2nd edition: 20161205 (1)

watcom c compiler 在 dos 時代很有名氣, 我沒用過, 對於用了好多年的 gcc, 我想試試不同的 c/c++ compiler。

watcom c compiler 的介紹: 惊艳的Open WATCOM C/C++

在 dos 時代沒用過, 反而是在 linux 環境下用了它, 不過真的讓我想要嘗試 watcom c 是因為他支援 pascal call convention, 我在 gcc 上沒找到支援 pascal call convention 的方式, 我又不想在 windows 下跑 vc 這個大傢伙 (vc 2012 目前好像也不支援 pascal call convention), 意外找到 watcom c。

很意外 debian/ubuntu 都沒有收錄 openwatcom, 它也是 opensource, 真是奇怪, 不知道是不是其授權的關係, 只好手工安裝。

download

執行 ./open-watcom-c-linux-1.9 來安裝 open watcom, 會跑出一個安裝程式, 如果遇到
~/openwatcom$ ./open-watcom-c-linux-1.9 
Floating point exception (core dumped)

https://groups.google.com/forum/#!topic/openwatcom.users.c_cpp/9rO3NwjfWfM

cd /usr/share/terminfo/x/
ln -s /lib/terminfo/x/xterm* .

設定環境變數: http://www.openwatcom.org/index.php/Installing_Open_Watcom_on_Linux

export WATCOM=~/ow/
. ~/ow/owsetenv.sh 

openwatcom 有自己的 include files,

linux 版本執行檔在 openwatcom/binl/*

編譯指令:
wcl386 -c -d1 a.c 
wcl386 a.o

如果遇到
Open Watcom C/C++32 Compile and Link Utility Version 1.9
Portions Copyright (c) 1988-2002 Sybase, Inc. All Rights Reserved.
Source code is available under the Sybase Open Watcom Public License.
See http://www.openwatcom.org/ for details.
 wlink @__wcl__.lnk
Open Watcom Linker Version 1.9
Portions Copyright (c) 1985-2002 Sybase, Inc. All Rights Reserved.
Source code is available under the Sybase Open Watcom Public License.
See http://www.openwatcom.org/ for details.
Warning! W1115: file wlink.lnk: line(20): environment name WATCOM not found
Error! E2093: file wlink.lnk: line(20): cannot open /binl/wlsystem.lnk
Error: Linker returned a bad status

設定 WATCOM 環境變數
descent@debian64:tmp$ export WATCOM=/opt/watcom/

-d1/-d2 是加入 debug information, 可使用 gdb 來作 source code level debug, 不過 openwatcom 也有提供一個親切畫面的 debugger。-d2 會多產生一些額外的程式碼。

-i../include 則是指定 include directory

-s remove stack overflow checks, 就不會看到 call <__chk> 這樣的程式碼

產生組合語言碼 ./b.s:

owcc -S b.c

已經習慣 command line/makefile 的編譯方式, 這並不會比學習 ide 慢上多少, 知道編譯動作的基本原理, 這些參數的功能都是一樣的, 不一樣的是選項名字。

openwatcom也自帶內建 vi, 很親切的畫面, 對於在其他平台上會讓 vi 使用者很熟悉。

ref:

2012年11月14日 星期三

[懷舊] jmcce 1.5 (0) - 從死亡到重生

jmcce 是一套中文終端機, linux 誕生之後的幾年, 在中文還要修修補補才能使用的年代, 有好幾套中文終端機, yact, bcs16, chdrv, jmce, zhcon ... 現在己經不太流行了。
ref: http://www.linux.org.tw/CLDP/OLD/Chinese-HOWTO-4.html

若你也經歷過那時期, 應該聽過 jmcce, 我使用過的 linux 中文終端機有 yact, chdrv, jmce。注意 jmce 和 jmcce 是不同的。 jmcce 則是我最後用過的中文終端機, 也是我覺得最好用的一個。最後一版應該是 jmcce 1.4, 那標題的 jmcce 1.5 是那裡來的, 當然是我自己修改的 XD

根據這篇: http://lists.linux.org.tw/pipermail/cle-devel/2002-May/002331.html jmcce 1.4 大約是在 2001 左右出現的, 那時候我還向開發者回報一些問題, 很快就得到修正的版本, 那時候的我還無法參與修改; 十年後 - 2012 年, 我把 jmcce 1.4 rc2 重新修改, 原有的 autobuild tool script 已經過時, 無法在新版本的 autotool 使用, 這東西實在煩人, 我只略懂, 不想花時間在上面, 我改為人工手寫 makefile, 至少可以 compile 了, 當然也很容易 cross compile。印象中 jmcce 有 1.4 正式版本, 不過我只找到 rc2 的版本, 我是從這版本改起。

jmcce 有些程式碼似乎是從 yact 來的, 我看了一下 yact source code, 裡頭有些 code 很雷同, yact 很偉大阿!

對於 opensource 的開發方式並不陌生, 不過我從來沒想過我也可以參與 opensource 開發。jmcce 成為我的第一次, 儘管她有點過時了, 不過讓死掉的專案復活, 爽度暴增。

為什麼挑上 jmcce? 繪圖模式下的終端機有, fbcon, fbterm ... fbcon 是由 linux kernel module 提供的, 相容性最好, 不過我不知道能不能顯示多國語言。

而因為我只喜歡在需要的時候才進入繪圖模式, 使用 svgalib 撰寫的 jmcce 符合這原則, 不過畢竟是古老的系統, 在 utf8 當道的現今, 她還是只能使用 big5。而使用 linux framebuffer 的終端機並不受我青睞, 但在非 x86 環境下, 就只能使用 linux framebuffer。

fbterm 似乎很先進, 有很多功能。jmcce 要做到 fbterm 還有很多程式碼要寫, 但是 jmcce 有著另外的優勢, 就是很多輸入法, 這就是 fbterm 沒有的了。fbterm 有用到 libx86, 這是幹嘛用的? 很神奇, 下一篇再講。

有一個 v86d 就是用 libx86 寫的。我的 fb 測試需要用到它。

NAME
       v86d - daemon to run x86 code in an emulated environment

SYNOPSIS
    v86d

DESCRIPTION
    v86d  provides  a  backend for kernel drivers that need to execute x86 BIOS code. The
    code is executed in a controlled environment and the results are passed back  to  the
    kernel via the netlink interface.

    v86d should NOT be run by the user, the kernel will call it, when it is needed.

AUTHOR
    v86d is written by Michal Januszewski.

    This  manual page was written by Evgeni Golov , for the Debian
    project (but may be used by others).

module uvesafb.ko 會需要 v86d, 真奇怪, kernel module 竟然需要 user mode daemon??

linux fb test:

測試 fb 是否有驅動起來
fbset -s
open /dev/fb0: No such file or directory

沒看到這字串就是有啟動 framebuffer, 這時可以看看解析度是多少。

在我的 eeepc 901 上測試 linux fb 時, 需要移除 i915 module, 並且安裝 v86d, 再 modprobe uvesafb, 然後使用 fbset 設定解析度為 640X480X256 color (jmcce 在這模式下才有最正常的畫面)。i915 gpu module 除了補強 x driver 外, 似乎還有著 framebuffer 的功能。

fbset -xres 640 -yres 480 -vxres 640 -vyres 480 -depth 8

也可以單純改顏色為 8bit, jmcce 畫面只會佔用 640x480
fbset -depth 8

若是直接使用 grub vga=769 這參數, 似乎無法使用 fbset 改變解析度。

提供另外的 fb command 作為參考。

hwinfo --framebuffer | grep Mode

linux svgalib test:

在 debian 關閉 linux framebuffer module 才能正常 (使用 uvesafb 則可以執行)。不保證能在 debian 以外的環境能正常執行。測試時最好不要開啟 framebuffer, 我是把 framebuffer module 刪除。不過在載入 uvesafb 時, svgalib 版本還是可以執行, 但是顏色有點問題。有問題就別掙扎了, 改用 fb 模式會愉快些, 這不是容易搞定的問題。

我打算用 c++ compiler, 就算不用 c++ 物件導向的功能, 也可以享受 c++ 標準程式庫帶來的便利性, 是的, jmcce 1.5 已經是 c++ 程式了, .c 結尾的程式名稱其實是 c++ 程式, 我懶得改了。爽快的使用 c++ 帶來的語言特性吧!

會重新開發這個程式只是想懷舊一下 svgalib 程式, 意外發現還看得懂 jmcce 的程式碼, 就順手改了起來, 原本以為只要花點時間改 makefile 會動就好, 沒想到到會動花了我 3 天時間, 更糟糕的是, 我還愈做愈有興趣 xD。看到 jmcce 成功秀出中文時, 那時的興奮之情到現在都還無法忘記。

20121009 ~ 20121030 這段期間我總共修改了:
  • build system: manual makefile
  • pseudo-terminal - use openpty()
  • remove old chewing chinese input method
  • add libchewing support
  • compile by g++4
  • remove asm function (asm_routine.S)
  • limit support utf8 chinese
  • compile linux fb without svgalib
  • use svgalib gl_xxx function, implement scroll function, display speed faster than vga_xxx, resolution fixed to 640x480x256 (vga_xxx is 640x480x16)
其實只要修改幾個地方就可以復活, 不過我加入 gl_xxx 系列的繪圖函式, 修改了捲動部份, 花了一點時間, 原本的 vga_xxx 沒有繼續修正, 不過也不需要了, gl_xxx 快很多。而組合語言的部份我拿掉了, 這會和 1.9.x 的 svgalib 相衝。

libchewing 已經改為使用 utf8 編碼, 我還特地將 utf8 -> big5, 有些字無法轉換成 big5, 有點蠢阿!

目前能使用 big5 和有限的 utf8 中文編碼, 有限度的支援中文 utf8, 為什麼有限度, 因為我是將 utf8 編碼轉成 big5 在 jmcce 上畫出, 一定會有 utf8 無法轉成 big5 的中文字, 要整個改版實在困難, 先將就著用吧!按下 ctrl+alt+8 直接切換 big5/utf8, 痛快。

我想如果沒支援 linux framebuffer 和 utf8, 這個中文終端機大概沒人會想用, 畢竟 x 環境和早期相比, 已經進步不少, 沒必要使用 console 中文終端機了。其實我自己也不想用; 現在頂多拿來上 ptt bbs, 已經勉強可以用酷音輸入; 在 keymap 的這邊似乎還有點問題, 先到這邊就好了, 我花了很多時間在找資料, 不過這部份資料實在不好找, 期待有強者改善這部份。暫時就這樣, 在改下去可能會是無底洞。

key function:
ctrl+alt+3 注音
ctrl+alt+7 酷音
ctrl+alt+8 utf8/big5 toggle

這只是個開始, 離能用還遠得很, 我也不見得會繼續完善她, 我的重心還是擺在 simple os 開發, 希望有其他朋友能一起參與 jmcce。


原本的 svgalib vga_xx function, 捲動速度實在很慢。 解析度: 640x480x16 color。

改用 svgalib gl_xx function, 捲動速度快了不少, 還我本速。 解析度: 640x480x256 color。

捲動處理:
console.c
scroll_down
scroll_up

酷音輸入法 api 使用方式:

todo list:
  • use linux framebuffer more mode, ex: 640X480X24bit color, 1024X768X32bit color
  • fixed linux keymap
  • real utf8 support
  • freetype2 supoort 
  • tune libchew input method

我希望能完成上述功能, 不過再來的進度不會這麼快, 慢慢來吧!

source code:
https://github.com/descent/jmcce

apt-get install libchewing3-dev libsvga1-dev
cd jmcce/src
make vgatest
make 
./jmcce

depend library:
libchewing
svgalib
ncurses

有興趣的朋友自己玩玩看, 有編譯上的問題可以問我。執行 jmcce 前可先執行 vgatest, 看看能否正常顯示 640X480X256 的模式。

lfb branch 有個只 support fb 的版本, 不使用 svgalib。

要是你看到 "descent modify jmcce 1.4 rc2" 覺得很不爽, grep VERSION_STRING 改成你喜歡的字串。

#define VERSION_STRING "descent modify jmcce 1.4 rc2 80x24"


2012年11月11日 星期日

[懷舊] jmcce 1.5 (1) - in apple ibook/ubuntu (powerpc)

這次要在 ibook/ubuntu (cpu: powerpc) 上測試 jmcce。

不過先來聊聊 fbterm 神奇的 vesa dirver。fbterm 除了使用 linux framebuffer 還提供了 vesa driver, 這是怎麼做的? 我很好奇, 原來是使用 libx86, 進而呼叫 bios 0x10 來使用 bios vesa function, 參考 vesadev.cpp L 48 ~ 61:

210 void VesaDev::printModes()

從這裡開始追起, linux 還有這樣的 library 可以用, 真是令我驚訝。不過這不是我想要的方式, 我想要的方式是直接操作 vga register, 不使用 bios call。這個 library 神奇的地方是: linux 處於保護模式下, 無法使用 bios call, 可是這 library 卻可以提供呼叫 bios 的能力, 真是厲害。

vesadev.cpp
1 /*
2 * Copyright © 2008-2010 dragchan <zgchan317@gmail.com>
3 * This file is part of FbTerm.
4 *
5 * This program is free software; you can redistribute it and/or
6 * modify it under the terms of the GNU General Public License
7 * as published by the Free Software Foundation; either version 2
8 * of the License, or (at your option) any later version.
9 *
10 * This program is distributed in the hope that it will be useful,
11 * but WITHOUT ANY WARRANTY; without even the implied warranty of
12 * MERCHANTABILITY or FITNESS FOR A PARTICULAR PURPOSE. See the
13 * GNU General Public License for more details.
14 *
15 * You should have received a copy of the GNU General Public License
16 * along with this program; if not, write to the Free Software
17 * Foundation, Inc., 675 Mass Ave, Cambridge, MA 02139, USA.
18 *
19 */

20
21 #include "config.h"
22 #ifdef ENABLE_VESA
23
24 #include <stdlib.h>
25 #include <stdio.h>
26 #include <unistd.h>
27 #include <string.h>
28 #include <fcntl.h>
29 #include <sys/io.h>
30 #include <sys/mman.h>
31 extern "C" {
32 #include <libx86.h>
33 }
34 #include "vesadev.h"
35 #include "vbe.h"
36 #include "fbterm.h"
37
38 #define MAX_VIDEO_MEM (16 * 1024 * 1024)
39 #define MIN(a,b) ((a) < (b) ? (a) : (b))
40
41 static s16 cur_mode;
42 static vbe_mode_info_block mode_info;
43 static LRMI_regs r;
44 static u32 scanline_width, scanline_height;
45
46 extern u32 effective_uid;
47
48 static bool call_bios()
49 {
50 bool success = true;
51 u16 fun = r.eax;
53 if (!LRMI_int(0x10, &r)) success = false;
54 if ((fun >> 8) == 0x4f && (r.eax & 0xffff) != 0x4f) success = false;
56 if (!success) {
57 fprintf(stderr, "call VESA function 0x%x failure!\n", fun);
58 }
60 return success;
61 }
62
63 static void save_restore_state(bool save)
64 {
65 static void *state_buf;
66 static u32 state_size;
67 static bool saved = false;
68
69 if (save) {
70 if (saved) return;
71
72 r.eax = VBE_FUN_SAVE_RESTORE_STATE;
73 r.ecx = 0xf; /* all states */
74 r.edx = 0; /* get buffer size */
75
76 if (!call_bios()) return;
77
78 state_size = (r.ebx & 0xffff) * 64;
79 state_buf = malloc(state_size);
80
81 void *buf = LRMI_alloc_real(state_size);
82
83 r.eax = VBE_FUN_SAVE_RESTORE_STATE;
84 r.ecx = 0xf; /* all states */
85 r.edx = 1; /* save state */
86 r.es = (long)buf >> 4;
87 r.ebx = (long)buf & 0xf;
88
89 if (call_bios()) {
90 saved = true;
91 memcpy(state_buf, buf, state_size);
92 }
93
94 LRMI_free_real(buf);
95 } else if (saved) {
96 void *buf = LRMI_alloc_real(state_size);
97 memcpy(buf, state_buf, state_size);
98
99 r.eax = VBE_FUN_SAVE_RESTORE_STATE;
100 r.ecx = 0xf; /* all states */
101 r.edx = 2; /* restore state */
102 r.es = (long)buf >> 4;
103 r.ebx = (long)buf & 0xf;
104
105 call_bios();
106 LRMI_free_real(buf);
107 }
108 }
109
110 static void save_restore_mode(bool save)
111 {
112 static s16 mode = -1;
113
114 if (save) {
115 r.eax = VBE_FUN_GET_CURRENT_MODE;
116 if (call_bios()) mode = r.ebx;
117 } else if (mode != -1) {
118 r.eax = VBE_FUN_SET_MODE;
119 r.ebx = mode;
120 call_bios();
121 }
122 }
123
124 // input: mode 0 for auto-detect
125 // return: -1 for failure
126 static s16 get_mode(s16 mode, bool only_print)
127 {
128 seteuid(0);
129 bool ret = (!LRMI_init() || ioperm(0, 1024, 1) || iopl(3));
130 seteuid(getuid());
131
132 if (ret) {
133 fprintf(stderr, "Using VESA requires root privilege\n");
134 return -1;
135 }
136
137 vbe_info_block *info = (vbe_info_block *)LRMI_alloc_real(sizeof(*info));
138
139 r.eax = VBE_FUN_GET_INFO;
140 r.es = (long)info >> 4;
141 memcpy(info->vbe_signature, "VBE2", 4);
142
143 if (!call_bios() || strncmp(info->vbe_signature, "VESA", 4) != 0) {
144 fprintf(stderr, "No VESA bios\n");
145 LRMI_free_real(info);
146 return -1;
147 }
148
149 s16 *mode_list = (s16*)(info->video_mode_list_seg * 16 + info->video_mode_list_off);
150 vbe_mode_info_block *minfo = (vbe_mode_info_block *)LRMI_alloc_real(sizeof(*minfo));
151 u32 xres_tmp, yres_tmp, bpp_tmp;
152 s16 mode_tmp = -1;
153 bool valid_mode = false;
154
155 for (; *mode_list != -1; mode_list++) {
156 r.eax = VBE_FUN_GET_MODE_INFO;
157 r.ecx = *mode_list;
158 r.es = (long)minfo >> 4;
159
160 if (!call_bios()) continue;
161
162 if (!(minfo->mode_attributes & VBE_ATTR_MODE_SUPPORTED)
163 || !(minfo->mode_attributes & VBE_ATTR_COLOR)
164 || !(minfo->mode_attributes & VBE_ATTR_GRAPHICS)
165 || !(minfo->mode_attributes & VBE_ATTR_LINEAR)) continue;
166
167 switch (minfo->bits_per_pixel) {
168 case 8:
169 if (minfo->memory_model != VBE_MODEL_PACKED) continue;
170 break;
171 case 15:
172 case 16:
173 case 32:
174 if (minfo->memory_model != VBE_MODEL_RGB) continue;
175 break;
176 default:
177 continue;
178 }
179
180 valid_mode = true;
181
182 if (only_print) {
183 printf("[%d]: %dx%d-%dbpp\n", *mode_list,
184 minfo->x_resolution, minfo->y_resolution, minfo->bits_per_pixel);
185 } else {
186 if (mode) {
187 if (mode == *mode_list) return mode;
188 } else {
189 if ((mode_tmp == -1)
190 || (minfo->x_resolution > xres_tmp && minfo->y_resolution > yres_tmp)
191 || (minfo->x_resolution == xres_tmp && minfo->y_resolution == yres_tmp && minfo->bits_per_pixel > bpp_tmp)) {
192
193 mode_tmp = *mode_list;
194 xres_tmp = minfo->x_resolution;
195 yres_tmp = minfo->y_resolution;
196 bpp_tmp = minfo->bits_per_pixel;
197 }
198 }
199 }
200 }
201
202 if (!valid_mode) fprintf(stderr, "can't find a valid VESA mode for your video card\n");
203 else if (!only_print && mode_tmp == -1) fprintf(stderr, "%d isn't a valid VESA mode for your video card\n", mode);
204
205 LRMI_free_real(info);
206 LRMI_free_real(minfo);
207 return mode_tmp;
208 }
209
210 void VesaDev::printModes()
211 {
212 get_mode(0, true);
213 }
214
215 VesaDev *VesaDev::initVesaDev(s16 mode)
216 {
217 cur_mode = get_mode(mode, false);
218 if (cur_mode == -1) return 0;
219
220 void *minfo = LRMI_alloc_real(sizeof(mode_info));
221
222 r.eax = VBE_FUN_GET_MODE_INFO;
223 r.ecx = cur_mode;
224 r.es = (long)minfo >> 4;
225 call_bios();
226
227 memcpy(&mode_info, minfo, sizeof(mode_info));
228 LRMI_free_real(minfo);
229
230 cur_mode |= 0x4000; // use linear frame buffer mode
231 return new VesaDev();
232 }
233
234 VesaDev::VesaDev()
235 {
236 mWidth = mode_info.x_resolution;
237 mHeight = mode_info.y_resolution;
238 mBitsPerPixel = mode_info.bits_per_pixel;
239
240 scanline_width = mWidth;
241 scanline_height = mHeight;
242 }
243
244 VesaDev::~VesaDev()
245 {
246 if (mVMemBase) munmap(mVMemBase, mBytesPerLine * scanline_height);
247 }
248
249 const s8 *VesaDev::drvId()
250 {
251 return "VESA";
252 }
253
254 void VesaDev::switchVc(bool enter)
255 {
256 if (enter) {
257 static bool inited = false;
258
259 if (!inited) {
260 save_restore_mode(true);
261 save_restore_state(true);
262 }
263
264 r.eax = VBE_FUN_SET_MODE;
265 r.ebx = cur_mode;
266 call_bios();
267
268 r.eax = VBE_FUN_LOGICAL_SCANLINE;
269 r.ebx = 0; // set scan line length in pixels
270 r.ecx = scanline_width;
271 call_bios();
272
273 if (!inited) {
274 inited = true;
275
276 r.eax = VBE_FUN_LOGICAL_SCANLINE;
277 r.ebx = 1; // get scan line length
278 call_bios(); // return ebx: scan line length in bytes
279 // ecx: scan line length in pixels
280 // edx: maximum scan lines
281
282 mBytesPerLine = r.ebx;
283 initScrollType();
284
285 seteuid(0);
286 s32 fd = open("/dev/mem", O_RDWR);
287 seteuid(getuid());
288
289 mVMemBase = (u8 *)mmap(0, mBytesPerLine * scanline_height, PROT_READ | PROT_WRITE, MAP_SHARED, fd, mode_info.phys_base_ptr);
290 close(fd);
291 }
292 } else {
293 save_restore_mode(false);
294 save_restore_state(false);
295 }
296
297 Screen::switchVc(enter);
298 }
299
300 void VesaDev::initScrollType()
301 {
302 r.eax = VBE_FUN_DISPLAY_START;
303 r.ebx = 0; // set display start
304 r.ecx = 0; // x = 0
305 r.edx = 0; // y = 0
306 if (!call_bios()) return;
307
308 if (mRotateType == Rotate0 || mRotateType == Rotate180) {
309 r.eax = VBE_FUN_LOGICAL_SCANLINE;
310 r.ebx = 1; // get scan line length
311 call_bios();
312
313 u32 max_height = MIN(r.edx, MAX_VIDEO_MEM / mBytesPerLine);
314 if (max_height <= mHeight) return;
315
316 mScrollType = YPan;
317 mOffsetMax = max_height - mHeight;
318 scanline_height = max_height;
319 } else {
320 // mWidth/mHeight has been swapped
321 u32 width = mHeight, height = mWidth;
322
323 r.eax = VBE_FUN_LOGICAL_SCANLINE;
324 r.ebx = 3; // get maximum scan line length
325 if (!call_bios()) return;
326
327 u32 max_width = r.ecx;
328
329 r.eax = VBE_FUN_LOGICAL_SCANLINE;
330 r.ebx = 0; // set scan line length in pixels
331 call_bios();
332
333 r.eax = VBE_FUN_LOGICAL_SCANLINE;
334 r.ebx = 1; // get scan line length
335 call_bios();
336
337 if (r.ecx <= width || r.edx < height) return;
338
339 scanline_width = max_width;
340 mScrollType = XPan;
341 mBytesPerLine = r.ebx;
342 mOffsetMax = r.ecx - width;
343 }
344 }
345
346 void VesaDev::setupOffset()
347 {
348 if (mScrollType != YPan && mScrollType != XPan) return;
349
350 r.eax = VBE_FUN_DISPLAY_START;
351 r.ebx = 0; // set display start
352 if (mScrollType == YPan) {
353 r.ecx = 0;
354 r.edx = mOffsetCur;
355 } else {
356 r.ecx = mOffsetCur;
357 r.edx = 0;
358 }
359 call_bios();
360 }
361
362 void VesaDev::setupPalette(bool restore)
363 {
364 if (mode_info.memory_model != VBE_MODEL_PACKED || restore) return;
365
366 vbe_palette_entry *buf = (vbe_palette_entry *)LRMI_alloc_real(sizeof(*buf) * NR_COLORS);
367
368 for (u32 i = 0; i < NR_COLORS; i++) {
369 buf[i].red = mPalette[i].red >> 2;
370 buf[i].green = mPalette[i].green >> 2;
371 buf[i].blue = mPalette[i].blue >> 2;
372 }
373
374 r.eax = VBE_FUN_PALETTE_DATA;
375 r.ebx = 0; // set palette data
376 r.ecx = NR_COLORS; // number of palette entry
377 r.edx = 0; // first palette entry
378 r.es = (long)buf >> 4;
379 call_bios();
380
381 LRMI_free_real(buf);
382 }
383 #endif

powerpc ubuntu 平台沒有 libx86 可裝, 無法使用 uvesa, 只能用其他的 fb 功能, 我是拿掉 radeon module, 修正一些 compile issue 後, 可以在 ibook/ubuntu 上使用。

下方影片是 jmcce 在 ibook (cpu: powerpc) ubuntu 10.04 上的測試畫面, 純粹使用 linux framebuffer, 由於 jmcce 只支援 fb 256 色, 所以需要使用 fbset -depth 8 設定為 256 色, 解析度則因為無法調整為 640X480, 維持原來的 1024X768, 所以畫面看起來就變成這樣子了。捲動效果還是不快。


非 x86/linux 無法使用 svgalib, 所以只能單純的使用 framebuffer, 看來執行得還算可以。